Tired of manually deploying your applications every time you make a change? You can actually push your code to GitHub and have it automatically deployed to Google Cloud Run within minutes, without ever touching a service account key.
This comprehensive guide walks you through setting up an automated deployment pipeline that connects your GitHub repository directly to Google Cloud Run. Using Workload Identity Federation, Google’s latest security innovation, you’ll learn how to deploy your applications securely without managing long-lived service account keys.
What you’ll achieve:
- Automatic deployment on every push to your main branch
- Secure authentication using short-lived tokens
- Docker container building and pushing to Artifact Registry
- Serverless deployment to Cloud Run with environment variables
- Complete CI/CD pipeline with zero manual intervention
Prerequisites
Required Access
GCP (Google Cloud Platform) Admin Access — You need admin privileges to create Workload Identity Federation and manage IAM permissions
Required APIs
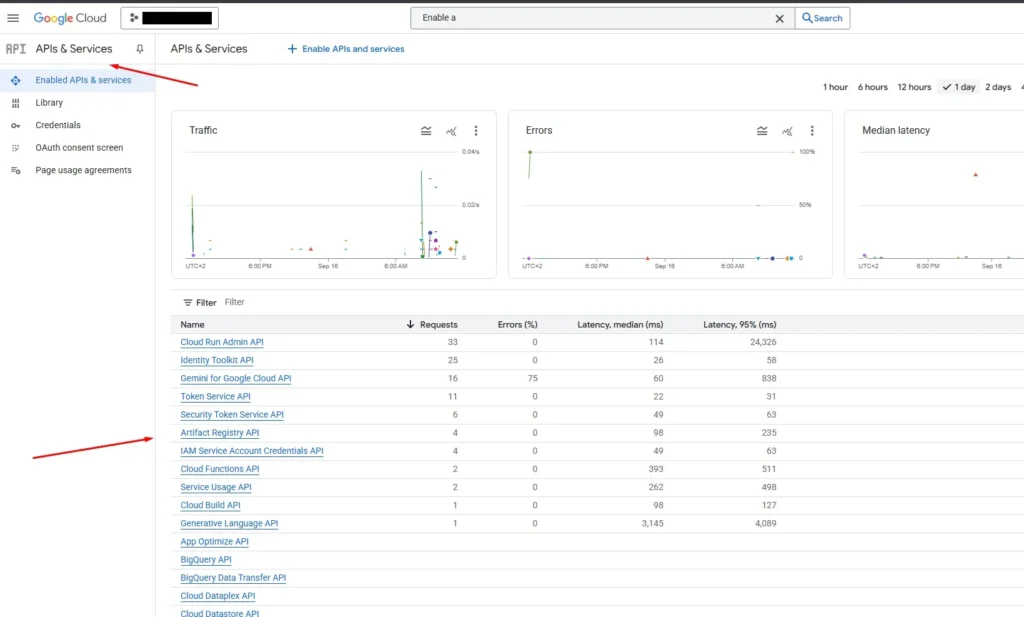
Enable these APIs in your Google Cloud Project (search for them in the GCP Console under “APIs & Services”):
1. Cloud Run Admin API — For deploying and managing Cloud Run services
2. Artifact Registry API — For storing Docker container images
3. Cloud Functions API — For serverless function deployment
4. Cloud Build API — For building container images
5. IAM Service Account Credentials API — For Workload Identity Federation
Check the image below for more details.
Step 1: Workload Identity Federation Setup
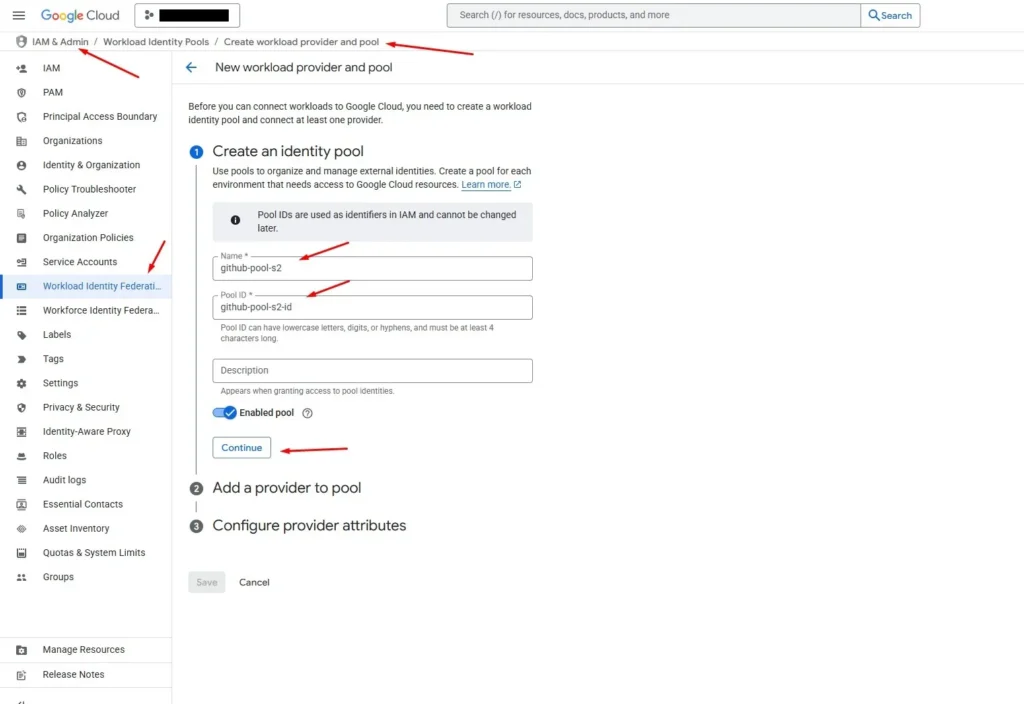
1.1 Create Workload Identity Pool
1. Go to IAM & Admin → Workload Identity Federation
2. Click “Create Pool”
3. Fill in the details as shown in the image below:
Important Notes:
– Each GitHub project should have its own workload pool for security isolation
– The Pool ID will be used in your GitHub Actions workflow
– Choose a descriptive name that identifies your project
Important: Click the “Edit” button under Name to edit the Pool ID to your preferred name.
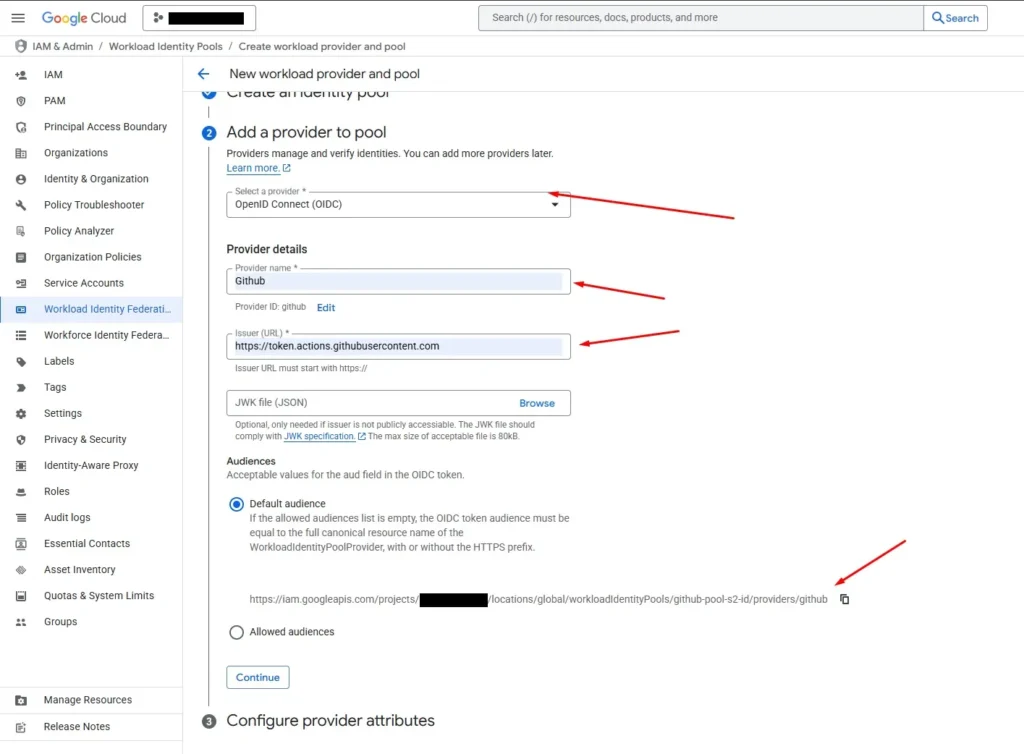
1.2 Add a Provider to Pool
1. After creating the pool, click “Add Provider”
2. Select “OpenID Connect (OIDC)” from the drop-down menu
3. Fill in the details as shown in the image below:
Why OIDC?
– OIDC (OpenID Connect) is the standard used by GitHub Actions for authentication
– It allows secure, keyless authentication without storing long-lived credentials
– GitHub generates short-lived tokens that Google Cloud can validate
1.3 Configure Provider Attributes
For the attribute mappings, we can reference the [Google Cloud article about keyless GitHub GCP authentication] (https://cloud.google.com/blog/products/identity-security/enabling-keyless-authentication-from-github-actions) to get the correct attributes.
Configure the attributes as shown in the image below:
Please be careful while adding the attributes as one grammar mistake can take a long debugging time to find it.
Required Attribute Mappings:
- `google.subject=assertion.sub`
- `attribute.actor=assertion.actor`
- `attribute.aud=assertion.aud`
- `attribute.repository=assertion.repository`

1.4 Set Attribute Conditions
Next, click on the “Attribute Conditions” button and add the condition for your chosen repository from GitHub.
In our case: `assertion.repository==’ValDrini21/search-agent’`
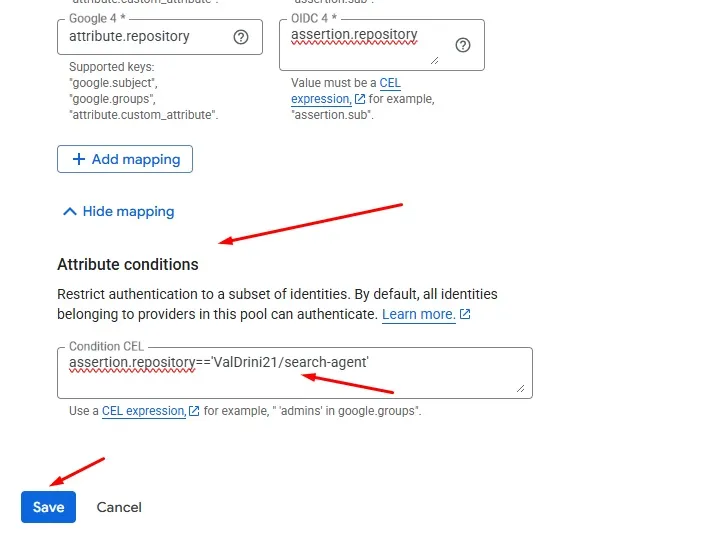
1.5 Complete Pool Creation
After clicking “Save”, the pool will be created successfully.
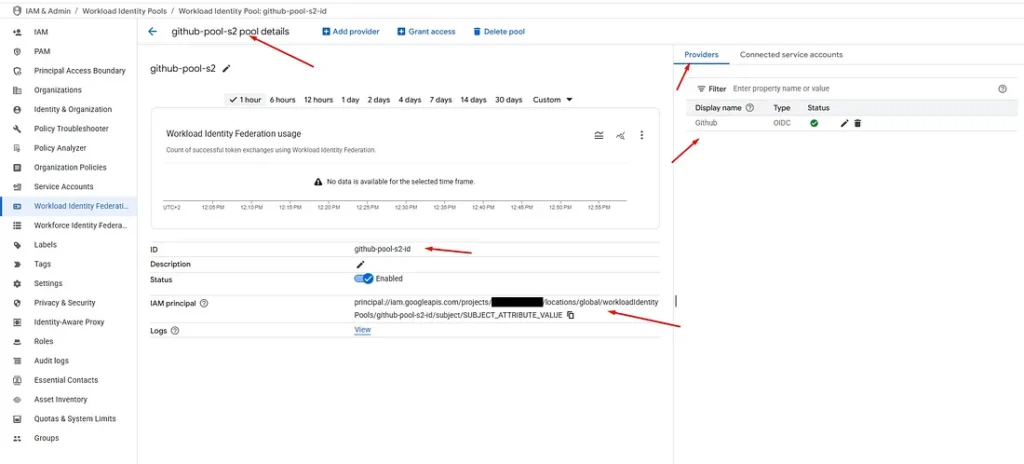
Workload Pool is created!
Now that your Workload Identity Pool is set up, you’ll need to create a Service Account and connect it to this pool for the GitHub Actions workflow to authenticate properly.
Step 2: Service Account Setup
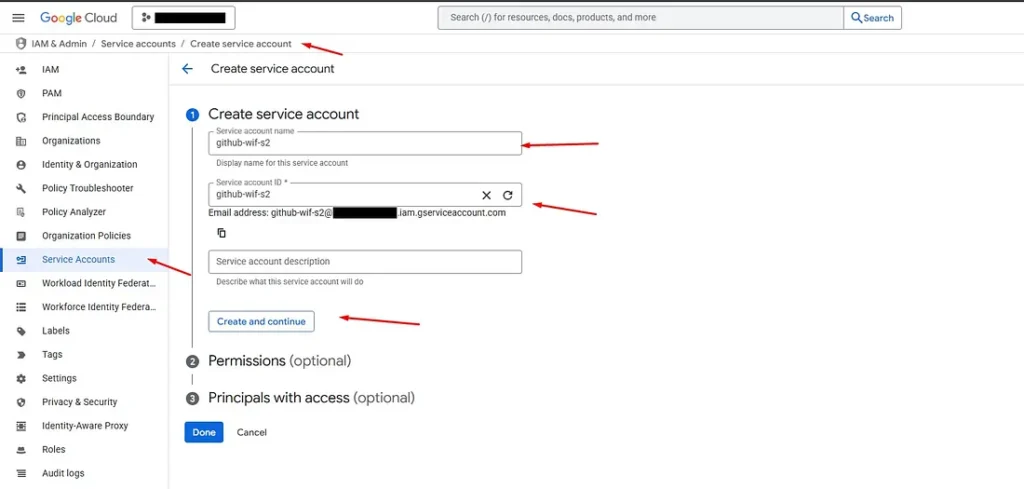
2.1 Create Service Account
The next step is to create a Service Account that will run commands on your behalf during the deployment process.
1. Go to IAM & Admin → Service Accounts
2. Click “Create Service Account”
3. Give it a descriptive name and continue
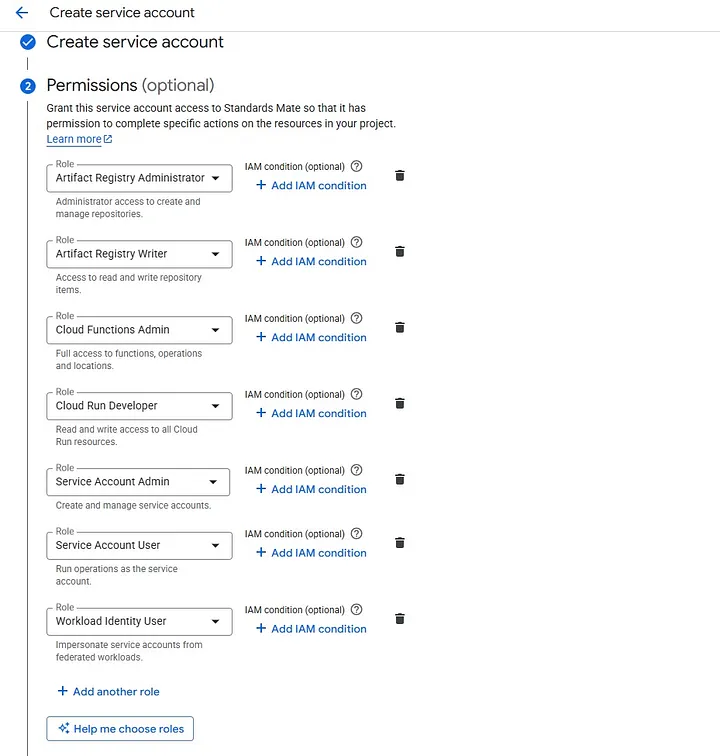
2.2 Assign Required Permissions
Add all the necessary permissions as shown in the image below and then continue:
Required Roles for GitHub Actions Deployment (All 7 Required):
1. Artifact Registry Administrator
– Administrator access to create and manage repositories
2. Artifact Registry Writer
– Access to read and write repository items
– Required for pushing Docker images to the registry
3. Cloud Functions Admin
– Full access to functions, operations and locations
4. Cloud Run Developer
– Read and write access to all Cloud Run resources
– Enables deploying and managing Cloud Run services
5. Service Account Admin
– Create and manage service accounts
– Required for service account operations
6. Service Account User
– Run operations as the service account
– Essential for Workload Identity Federation to impersonate the service account
7. Workload Identity User
– Impersonate service accounts from federated workloads
– Critical for GitHub Actions to authenticate using Workload Identity Federation
2.3 Complete Service Account Creation
After assigning all the required permissions, click “Done” to complete the service account creation.
2.4 Verify Service Account Creation
Now if you visit Service Accounts, you should be able to see the new service account that has been created, just like in the image below:

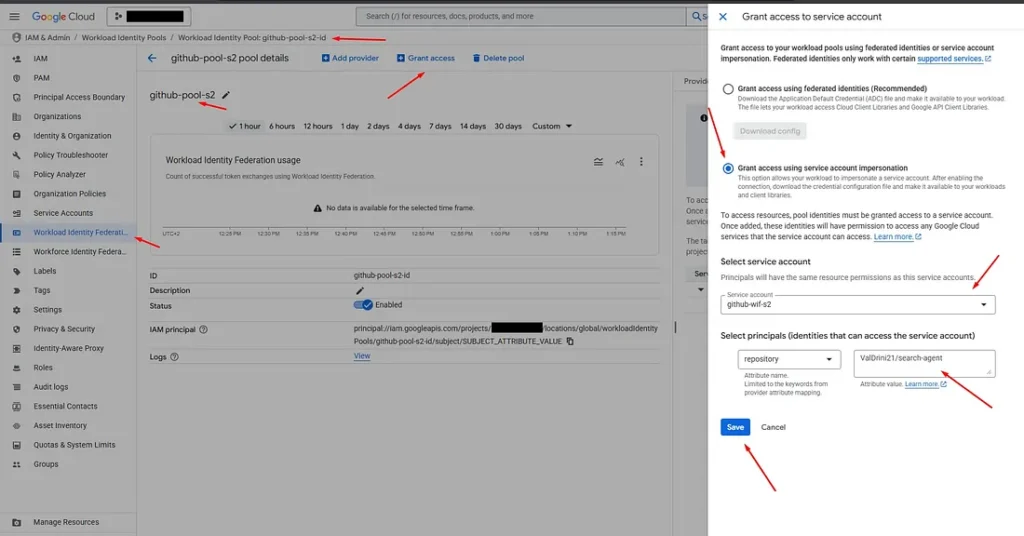
Step 3: Connect Service Account to Workload Identity Pool
The next step is to connect the workload pool you created with the service account. This connection is crucial for enabling GitHub Actions to authenticate securely.
Step-by-Step Connection Process:
1. Go to Workload Identity Federation option
2. Choose the workload pool that you created earlier
3. Click the “Grant Access” option
4. Choose the second option (Service Account)
5. Select the service account that you created
6. Choose “Repository” as the principal identity
7. Paste your desired GitHub repository: `ValDrini21/search-agent`
8. Click “Save” to complete the configuration
The application of the connection between the service account and the workload pool may take a bit of time (approximately 1–3 minutes). This is normal and expected behavior.
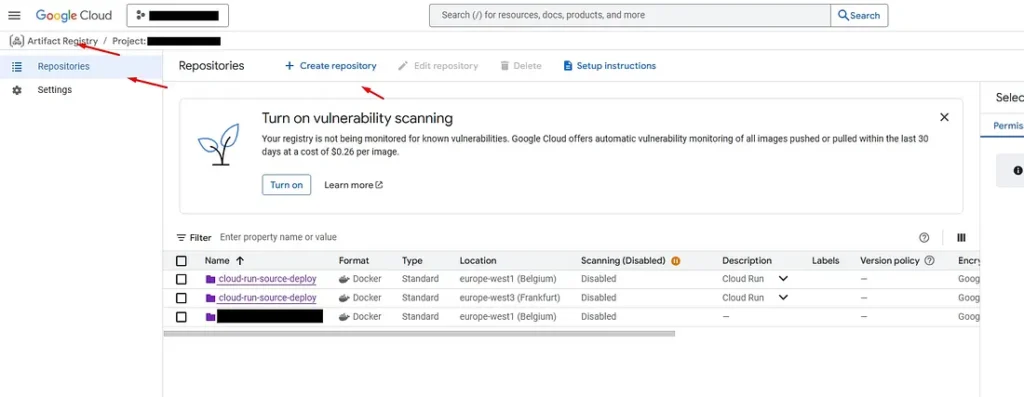
Step 4: Artifact Registry Setup
4.1 Create Docker Repository
The next step is to create a repository inside Google Cloud Platform’s Artifact Registry option (in your project).
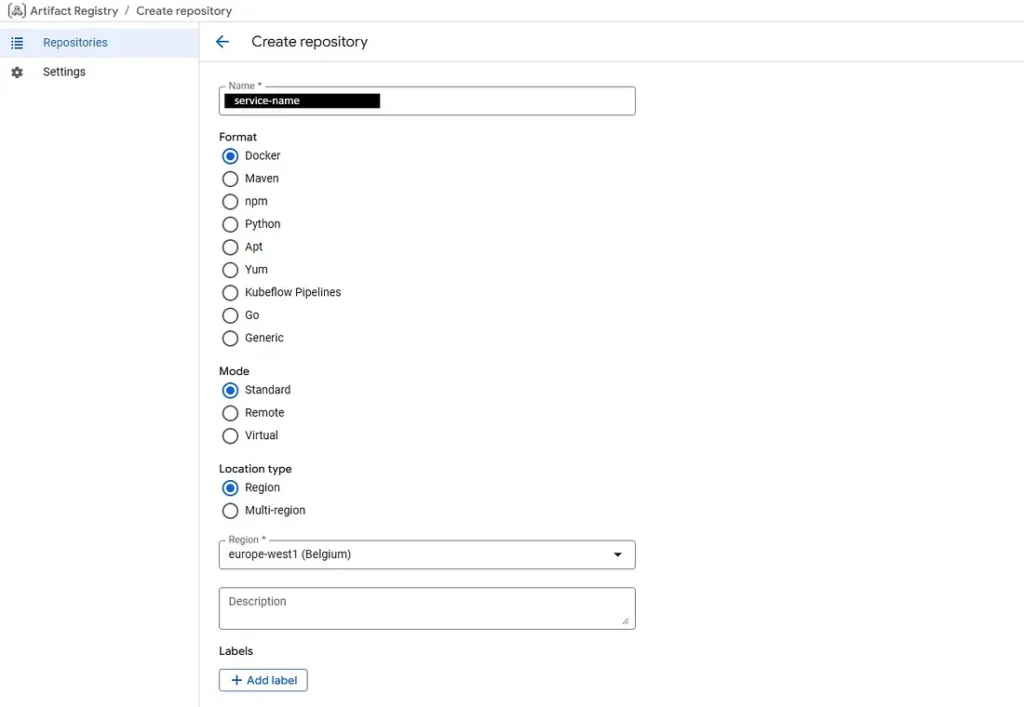
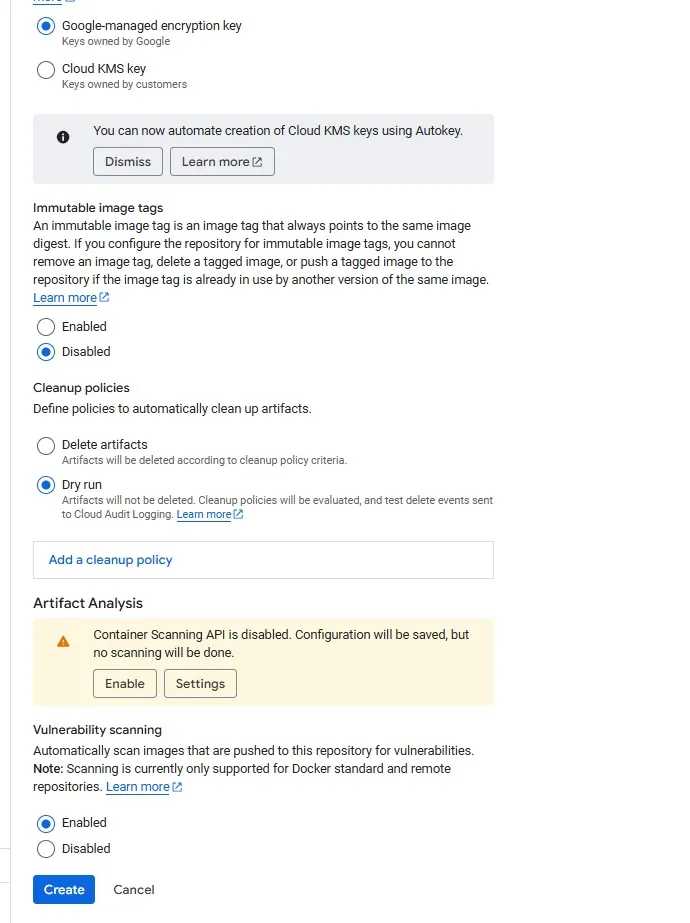
4.2 Configure Repository Settings
The images below show the configurations for the Artifact Registry repository:
Repository Configuration Details:
- Repository Name: `service-name` (should match your SERVICE variable in the workflow)
- Format: `Docker` (for container images)
- Mode: `Standard` (recommended for most use cases)
- Location: `europe-west1` (or your preferred region)
Why Artifact Registry is Essential:
- Container Storage: Stores your Docker container images securely
- Version Control: Maintains different versions of your application images
- Integration: Seamlessly works with Cloud Run deployments
- Security: Provides secure, private container image storage
- Performance: Optimized for fast image pulls during deployment
Step 5: Github Actions Configurations
5.1 Create Workflow File
The next step is to configure the workflow file on GitHub Actions. You need to have a ready-to-deploy repository on GitHub. We are using a public project which you can check as well: https://github.com/ValDrini21/search-agent. This is a demonstration repository. The GCP resources have been deleted for security. To use this workflow copy the content from section 5.3.
Step-by-Step Workflow Creation:
1. From your GitHub repository view, click on the “Actions” option
2. Click “New Workflow” option
3. From the workflow options, choose the template called “Build and Deploy to Cloud Run”
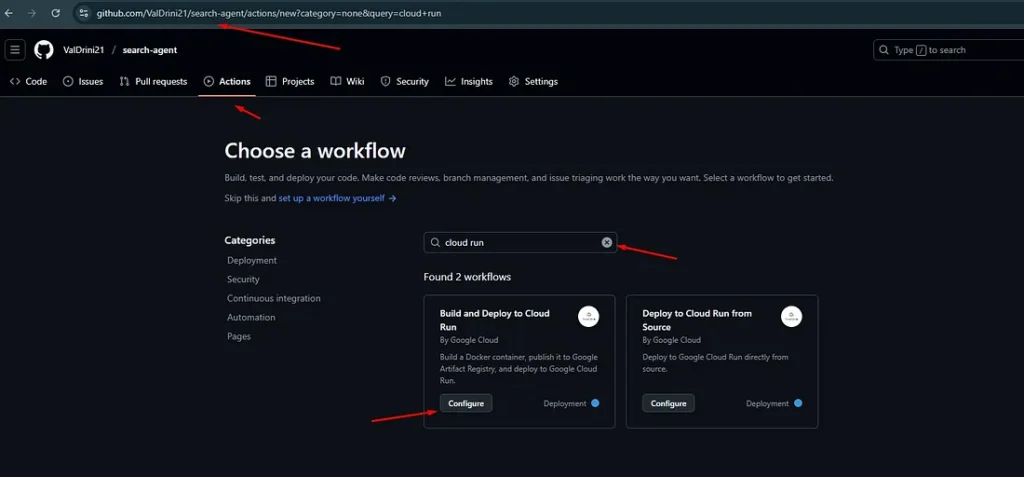
Why This Template is Perfect:
- Pre-configured: Has all the necessary parameters and configurations already set up
- Google Cloud Optimized: Specifically designed for Cloud Run deployments
- Complete Pipeline: Includes authentication, building, pushing, and deploying steps
- Best Practices: Follows Google Cloud and GitHub Actions best practices
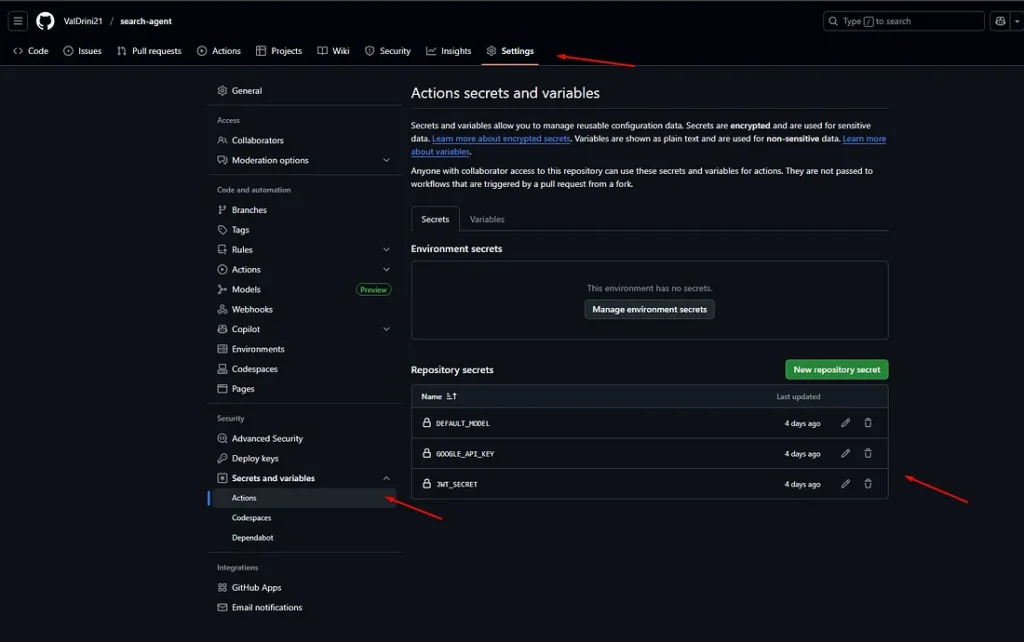
5.2 Configure GitHub Secrets
To configure this workflow file, you need to add 3 essential keys to your repository’s Secrets and Variables (Actions).
Required GitHub Secrets:
- `DEFAULT_MODEL` — The default AI model to use for your application (we have set an AI LLM model like “gemini-1.5-flash” because this specific project uses ADK)
- `GOOGLE_API_KEY` — Your Google API key for accessing Google services
- `JWT_SECRET` — Your JWT secret key for authentication
Note: To learn more about these variables, please read the README.md file from the project GitHub repository.
5.3 Customize the Workflow File
You can copy the configuration file from the text below and customize it with your specific project details:
name: "Build and Deploy to Cloud Run"


on:
  push:
    branches:
      - "main"


env:
  PROJECT_ID: "project-id" # TODO: update to your Google Cloud project ID
  REGION: "europe-west1" # TODO: update to your region
  SERVICE: "service-name" # TODO: update to your service name
  WORKLOAD_IDENTITY_PROVIDER: "projects/your-project-number/locations/global/workloadIdentityPools/github-pool-s2-id/providers/github" # TODO: update to your workload identity provider


jobs:
  deploy:
    runs-on: "ubuntu-latest"


    permissions:
      contents: "read"
      id-token: "write"


    steps:
      - name: "Checkout"
        uses: "actions/checkout@v4"


      - id: "auth"
        name: "Authenticate to Google Cloud"
        uses: "google-github-actions/auth@v2"
        with:
          workload_identity_provider: "projects/your-project-number/locations/global/workloadIdentityPools/github-pool-s2-id/providers/github"
          service_account: "github-wif-s2@project-id.iam.gserviceaccount.com"


      - name: "Docker Auth"
        run: |
          gcloud auth configure-docker ${{ env.REGION }}-docker.pkg.dev


      - name: "Build and Push Container"
        run: |-
          DOCKER_TAG="${{ env.REGION }}-docker.pkg.dev/${{ env.PROJECT_ID }}/${{ env.SERVICE }}/search-agent:${{ github.sha }}"
          docker build --tag "${DOCKER_TAG}" .
          docker push "${DOCKER_TAG}"


      - name: "Deploy to Cloud Run"
        uses: "google-github-actions/deploy-cloudrun@v2"
        with:
          service: "${{ env.SERVICE }}"
          region: "${{ env.REGION }}"
          image: "${{ env.REGION }}-docker.pkg.dev/${{ env.PROJECT_ID }}/${{ env.SERVICE }}/search-agent:${{ github.sha }}"
          flags: "--allow-unauthenticated --port=8000 --set-env-vars=JWT_SECRET=${{ secrets.JWT_SECRET }},GOOGLE_CLOUD_PROJECT=${{ env.PROJECT_ID }},GOOGLE_CLOUD_LOCATION=${{ env.REGION }},GOOGLE_API_KEY=${{ secrets.GOOGLE_API_KEY }},GOOGLE_GENAI_USE_VERTEXAI=False,DEFAULT_MODEL=${{ secrets.DEFAULT_MODEL }}"


      - name: "Show output"
        run: |
          echo ${{ steps.deploy.outputs.url }}
5.4 Understanding the Workflow File Configurations
Environment Variables (env section):
- `PROJECT_ID`: Your Google Cloud project ID
- `REGION`: Your preferred deployment region (e.g., europe-west1, us-central1)
- `SERVICE`: Name of your Cloud Run service (must match Artifact Registry repository name)
- `WORKLOAD_IDENTITY_PROVIDER`: The full path to your workload identity provider
Key Configuration Details:
WORKLOAD_IDENTITY_PROVIDER:
- Source: Get this from your Workload Identity Federation pool
- Format: `projects/PROJECT_NUMBER/locations/global/workloadIdentityPools/POOL_ID/providers/PROVIDER_ID`
- Example: `projects/12345678912/locations/global/workloadIdentityPools/github-pool-s2-id/providers/github`
SERVICE_ACCOUNT:
- Source: Get this from your Service Accounts page
- Format: `SERVICE_ACCOUNT_NAME@PROJECT_ID.iam.gserviceaccount.com`
- Example: `github-wif-s2@project-id.iam.gserviceaccount.com`
Workflow Steps Explained:
1. Checkout: Downloads your repository code
2. Authenticate: Uses Workload Identity Federation to authenticate with Google Cloud
3. Docker Auth: Configures Docker to push to Artifact Registry
4. Build & Push: Builds your Docker image and pushes it to Artifact Registry
5. Deploy: Deploys the new image to Cloud Run with environment variables
6. Show Output: Displays the deployed service URL
After configuring the workflow file with your specific values, you need to commit the changes and wait for GitHub Actions to deploy the project.
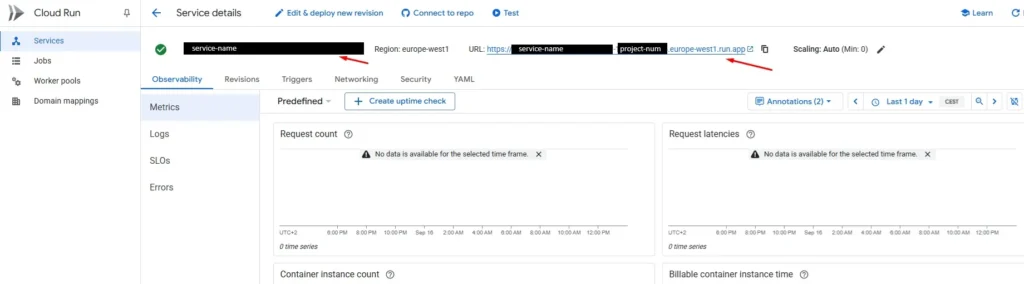
5.5 View Service Details
If the deployment has deployed successfully, click on the service you created to view the deployed project data and service URL.
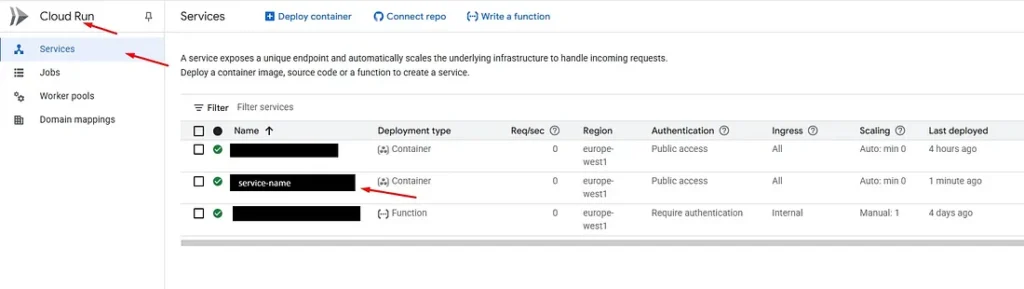
Service URL
Troubleshooting Failed Deployments:
If the deployment fails, you can check the GitHub Actions logs to see what went wrong:
Common issues include: incorrect project ID, missing permissions, or invalid service account configuration
Step 6: Testing and Validation
6.1 Test API Endpoints
Testing with Postman:
1. Open Postman or any HTTP client
2. Use the service URL from your Cloud Run service details
3. Test your API endpoints (e.g., `/health`, `/docs`, ‘list-apps’, etc.)
4. If everything has gone correctly, you should see the response as shown in the image below:

6.2 Validate the CI/CD Pipeline
The final test is to verify that your CI/CD pipeline is working correctly:
1. Make a small change to your project code (e.g., update a comment or version number)
2. Commit and push the changes to the `main` branch
3. Monitor GitHub Actions to see the automatic deployment trigger
4. Wait for deployment to complete (usually 2–4 minutes)
5. Check Cloud Run to verify the new revision is deployed
6. Test the changes to confirm they’re reflected in production
Step 7: Materials and References
7.1 Video Tutorials
– https://www.youtube.com/watch?v=4FRjoc9ycNs
– https://www.youtube.com/watch?v=psm98noY-JM
7.2 Official Documentation
– [Enabling keyless authentication from GitHub Actions](https://cloud.google.com/blog/products/identity-security/enabling-keyless-authentication-from-github-actions)
7.3 Additional Resources
– [Google Cloud Run Documentation](https://cloud.google.com/run/docs)
– [GitHub Actions Documentation](https://docs.github.com/en/actions)
– [Workload Identity Federation Guide](https://cloud.google.com/iam/docs/workload-identity-federation)